Working with Datasources
A Brief Overview
Sometimes it is much easier on the workflow of office staff to have data in a Google Sheet, RSS Feed, or a basic table. Sometimes building a full SQL database is just overkill for what is needed. Examples might be a list of members without unique id’s or simply a simple list of products. Datasources have very little connection, if any, with other data on your website. They are standalone tables of data, simply for presentation purposes.
If you have a datasource under “Content” > “Datasources”, then your developer has already setup an app to use the datasource and setup the fields required for the custom app.
Create: Step-by-step guide
If you need to create a new category, 1st ensure that your designer has setup the category for your customized app.
Click on "Content" > "Datasources" in the main navigation.
Edit a datasource by clicking on the title and then clicking the edit link.
Ensure the category is not already listed
Click the “Add Data” button and enter the following information.
Version Title (required)
Select a “Version Category” from the list
Enter a Version Date (usually the date first published)
Click the “Save” button to load the data table
EDIT OR UPLOAD
Please choose from the following optionsEdit records directly within the table.
Note: To add or remove a row, please right-click on the row to choose from the sub-menu.
Also Note: There is currently no way to re-order the rows. We are working on this, but you can manually order them by creating new rows, entering the information, and removing the old row.Upload a CSV file to replace the current data
You can upload a csv file that matches the current columns by following the steps below. Please note, this will replace the current dataClick on the “I have a CSV file I would like to upload” checkbox
Drag-n-Drop or click the drop-zone to browse for your CSV file
Your file will automatically upload and replace your current data
Continue to edit records as needed
When done editing the data, click on the “Save” button at the top of the screen.
After the data has been saved, click the “Close” button to close this data category and return to the datasource.
When all changes are complete, click on the “Save” button at the top of the screen.
Update: Step-by-step guide
Click on "Content" > "Datasources" in the main navigation.
Edit a datasource by clicking on the title and then clicking the edit link.
You may have one or multiple categories within your datasource.
Choose the category/version you want to edit and click the edit link next to it
EDIT or UPLOAD
Please choose from the following optionsEdit records directly within the table.
Note: To add or remove a row, please right-click on the row to choose from the sub-menu.
Also Note: There is currently no way to re-order the rows. We are working on this, but you can manually order them by creating new rows, entering the information, and removing the old row.Upload a CSV file to replace the current data
You can upload a csv file that matches the current columns by following the steps below. Please note, this will replace the current dataClick on the “I have a CSV file I would like to upload” checkbox
Drag-n-Drop or click the drop-zone to browse for your CSV file
Your file will automatically upload and replace your current data
Continue to edit records as needed
When done editing the data, click on the “Save” button at the top of the screen.
After the data has been saved, click the “Close” button to close this data category and return to the datasource.
When all changes are complete, click on the “Save” button at the top of the screen.
CSV FILE UPLOAD BUG
There is currently a small but when uploading a csv file to replace the data in the datasource.
After you upload the file, the first row from the old data will remain, and the column names will also be imported, resulting in the first 2 rows of the datasource to be incorrect.
To resolve this issue, please right click on the first and second row to delete them prior to saving.
Adding Images
If your customized app, contains images, you can upload the images to the “Media” tab. Your designer will let you know if your custom app uses images and what column to use.
Upload images into the “Media” tab by clicking the “Add Photos, Videos, and Files” button.
Drag-n-Drop images into the upload panel, and then click the green “Upload Files” button.
Uploaded images will appear under the drop zone.
Please note the ID for the image. You will need this number when editing your data.
Note: If you do not see the ID, you may have to click the “Save & Continue to Edit” button at the top of the page.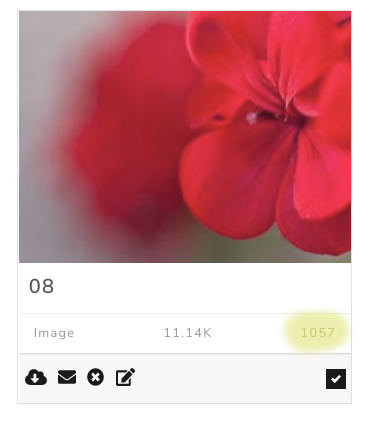
Click on the datasource tab and continue with the steps above in “Update: Step-by-step”
Enter the ID number into the column specified by your designer.
Click the “Save” button to save the data.
Tip
It may be easiest to use a piece of paper to note the record you want to edit and the ID of the image you want to associate to it. This way you can simply note all the image ID’s and then enter them all at once.
We are aware that this is quite cumbersome and we are working on a way to easily choose the image directly from the data table.